Pages

Showing posts with label Finishes. Show all posts

Wednesday, September 5, 2012

Funky Turned Beauty

Boy have I got a makeover for you! Are you ready for this before? It's kinda extreme.


Right?! Wow. Speechless! A friend of mine gave this to me thinking I might be able to do something with it. It sat in my garage for a few weeks until I had just the right plan. By then I had dubbed it "Funky Dresser".  And over the last week (yes, a whole freaking week!!) she got beautified!
Before:
Love the back. Such a good bones and a nice old piece.

It all started with me thinking I could just sand off a bunch of layers... little elbow grease and wa la! Magic! But wait... no magic here. Just more funk.

At that point I knew I had to get my paint on. Two coats of paint should do me. I was not sure if I would distress but in the end my motto pushed through: Distress, because you know your kids will.

Oh and did I forget to mention a little decoupage action went on too! This is old wallpaper from our first house. I loved and miss that dining room and still have a few rolls and scraps of my all time favorite wallpaper.

After all the painting and papering it did not jive with me. So I mixed up some glaze and slapped it on. The dents and dings in this piece looked soooooo much prettier when they were accentuated with the glaze.

I have not quite decided what to do with this little funky turned beauty dresser. I thought about sticking into a craft corner in my playroom or possibly trying to sell it. For now I'll try her out and see what I think. I actually quite love it in my dining room.

Linking up at these great blogs:
Not Just a Housewife

Ivy and Elephants

AKA Design

Thursday, July 19, 2012

The Accidental Table

Last weekend I showed my Facebook Followers a sneak peek of my "accidental" table. Accidental because I had ZERO intentions of building a dining room table right now but when I stumbled upon legs for only $10 each I made a quick table plan in my head. And this is what I pictured!!!

I've done the step by step table post before so I won't bore anyone with that right now. Instead I'll share my finishing details.
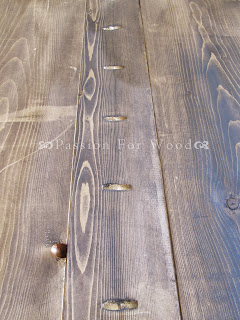
I like to finish my tables in two pieces; top and bottom. It makes it so easy to get in all the nooks and crannies and doubly easier when you decide to do a two-tone finish. For my top I started on the underside with a little experiment. I applied Wood Condition to each outside board but not to the center board, hoping to see if there were any big differences.
You can see a slight color change on the conditioned wood vs. non conditioned. If interested in more on this topic read here.

After waiting about 20 minutes I applied the stain. And I really notices no difference. the only thing I did notice was that the stain went on more smoothly on the conditioned boards. Do you notice anything? Doubt it.

So I let the bottom dry over night then flipped her over and applied two coats of stain, sand between coats. I did ultimately decide to use wood conditioner on the top just to make it go on smoothly and for justincase.
I let the top dry overnight and then sanded again with 220 sandpaper and cleaned it really well before I started to apply polyurethane. I then did a total of three coats of poly, sanding with 0000 steel wool between each coat. Look at her shine! This was taken right after the last coat was applied so it is not actually quite this shiny.

Now, onto the bottom. Here's where bleep hit the fan. I applied wood conditioner, justincase, then stained, and I was immediately grossed out by the look of the legs. They were nasty. So sad. I have used similar legs before but used a gel stain so maybe that was the differencce.

Time for a change of plans!!!! Spray paint to the rescue! I love a good two-tone look anyway so my sadness quickly went away.

After all the spraying and drying overnight I distressed. Distressing is a tricky way to get rid of those spots that aren't very pretty and make them look like they were meant to be that way. Another thing to think about when distressing furniture is to think of where the piece would wear naturally over time. For a table like this it would be in the areas where chair legs would hit it and people would rub it while getting up and done from the table.


My accidental table. I am in love. It is not the table I planned for this space. But it will certainly do, for now. ;)


This post is linking up here:
AKA Designs DIY Link Party #40
 
Pin It button on image hover